Harper’s Library, Vol. I

One of my favorite parts of getting Harper’s nursery together has been figuring out which books are absolute must-haves for her shelves. I’ve always been an avid reader, and I hope to pass my love of reading on to her.

We’ve received a lot of classics as gifts – Goodnight Moon, Matilda, Pat the Bunny, Alice’s Adventures in Wonderland and Through the Looking Glass; and also some newer stories that are favorites around here already – Chick ‘n Pug, Hedgehugs, On the Night You Were Born. These, and many others, have been in heavy rotation already, so I decided it was time to treat us to some new titles. (Alice is still in our current rotation – I like to read a chapter at a time to Harper while she falls asleep.)

Inside


I came across the Baby Lit and Hello, World books via Amazon and fell in love with them immediately. Vintage-style illustrations and lovely color palettes are really all I need when it comes to a kid’s book. Our new additions to the library include: New York: A Book of Colors, Wuthering Heights: A Weather Primer, San Francisco: A Book of Numbers, Alice in Wonderland: A Colors Primer, and London: A Book of Opposites.

NY and WH

SF and Alice

London

The books are adorable and I look forward to adding more from these series to Harper’s library soon.


Thai Cashew Coconut Rice with Ginger Peanut Sauce {GF} {V}

If you follow me on Instagram (@julie.grubbs if you don’t and would like to), you may have seen my rave review of this rice a few weeks ago. I found the original recipe via Host the Toast and good crap is this dish amazing. Rice cooked in coconut milk! I’m ashamed that this was a new thing for me – It’s actually life-changing.

IMG_8290I made one change from the original recipe and sautéed the veggies in a little bit of coconut oil instead serving them raw. Do whatever suits your fancy, because either way, you’re going to love it.

IMG_8289I found it helpful to chop my veggies the night before so I could toss them in a pan as soon as I got home from work and save 15 minutes or so, which is essential these days. While the veggies were sautéing and the rice was ricing, I whipped up the peanut sauce, which honest to goodness tastes yummy enough to drink by itself. Host the Toast recommends microwaving the peanut butter and honey together to soften them a bit, but since we do not have a microwave, I used my immersion blender to blitz everything into a perfect, saucy consistency.

Once the veggies and rice are finished cooking, combine veggies with cashews and cilantro in a large bowl. Add the rice, combine again, and then add the peanut sauce and combine once more. It’s really that easy… and tastes amazing!

Thai Cashew Coconut Rice {Modified from Host the Toast}

For the Coconut Rice:
  • 1½ cups dry jasmine rice
  • 1 (15 oz) can unsweetened coconut milk
  • 1 clove garlic, minced
  • 1 teaspoon salt
  • 1 cup water
For the Veggies:
  • 1 tbsp coconut oil (olive oil works well, too)
  • 2 red bell peppers, finely chopped
  • 1/2 Savoy cabbage, shredded
  • 1½ cups shredded carrots
  • 1 small sweet onion, finely diced
  • 1/2 cup cilantro, chopped
  • ¾ cup green onions, thinly sliced
  • 1 cup cashews, finely chopped
For the Ginger Peanut Sauce:
  • ⅓ cup peanut butter
  • 2 tablespoons honey
  • 3 teaspoons freshly grated ginger
  • 2 tablespoons rice vinegar
  • 2 teaspoon sesame oil
  • Water to thin

Directions:

  1. In a medium-sized pot, mix together the rice, coconut milk, garlic, salt, and water. Cover and bring to a boil.
  2. Once the pot reaches a rolling boil, reduce heat to low and let simmer for 30 minutes.
  3. After 30 minutes, turn off heat and let sit (with lid on) for an additional 10 minutes.
  4. While the rice is cooking, sauté red peppers, cabbage, carrots, and onion in a large pan on med-low heat.
  5. As you wait for the rice and veggies, make the peanut sauce.
  6. In a bowl or measuring cup, combine the peanut butter, honey ginger, rice vinegar, and sesame oil. Blend with immersion blender until smooth. Add water to thin (I added 1/4 cup) and blend again.
  7. Fluff the rice and combine it with the chopped vegetables and cashews in a large bowl. Drizzle with the Ginger Peanut Sauce and combine again. Enjoy!

Blueberry Cake with Lemon Glaze {Gluten-Free}

Last week I saw Hey Natalie Jean’s blueberry cake and absolutely had to make it. Hers had a pretty purple huckleberry glaze, but I opted for lemon since I’m not entirely sure where to get my paws on huckleberry syrup at the last minute.

IMG_8287

The cake was an uncomplicated affair, save for the flour/baking powder mixture I had to trash when I swore that twice I saw ‘tbsp’ and not ‘tsp’ … post-nap pregnant me is really something. Luckily I realized this before combining any additional ingredients and saved us all a science experiment of sorts during the baking process.

I threw the lemon glaze together while the cake was baking. A classic Martha Stewart recipe that is fabulous and foolproof.

IMG_8285

Per Natalie’s instruction, I let the cake sit for at least half an hour before pouring on the glaze. Just a little drizzle and smoothing out with a spatula and you’re set. Do make sure that you’re plate has enough of a lip to catch any glaze that might run off the cake.

IMG_8286

The cake reminded me of a blueberry donut and it took whatever willpower I have left to not dig in to a piece for breakfast. And, believe me, willpower feels like a scarce thing at nearly 8 months pregnant.

Blueberry Cake with Lemon Glaze (Inspired by Hey Natalie Jean and Martha Stewart)

Ingredients:

Cake:
2 cups rice flour
2 tsps baking powder
dash salt
2/3 cup olive oil
1 1/2 cups sugar
2 eggs, room temperature
1 cup milk
1 tsp vanilla extract
1 1/2 cups blueberries, lightly coated in flour

Glaze:
2 cups powdered sugar
3-4 tablespoons fresh lemon juice
Directions:
1. Combine flour and baking powder in a medium bowl and sift to combine.
2. Combine oil, sugar, eggs, milk, and vanilla in a separate bowl and whisk until light and creamy.
3. Combine dry ingredients with wet in three parts. Mix well, then add your blueberries lightly coated in flour.
4. Pour batter into a greased cake pan (mine is 9″) and bake at 325 degrees F for 60-70 minutes.
5. While cake is baking, combine powdered sugar with lemon juice and stir to combine. Glaze should be thick, yet pourable.
6. One cake has cooled, run a knife along edges of the pan and flip over onto a cooling rack or plate. Pour glaze over top of cake and smooth with a spatula.


Gluten-Free Mac and Cheese

2015-10-25 17.51.42

Homemade mac ‘n cheese, it does the trick every time. And better yet, it doesn’t have to be over-the-top or complicated in the least, which is especially great these days since I am not in the mood for complicated whatsoever.

The sauce is simple and comes together pretty quick. Butter and white rice flour make a roux, and once that has been combined, salt, pepper, dijon mustard, and milk are whisked in until bubbling. I used a spatula to check every minute or so for flour that hadn’t yet whisked in. By the time it was bubbling, all was combined and well. Once bubbles form, reduce the heat and add the cheese (so much cheese!), reserving half a cup for topping.

2015-10-25 17.55.21-1

While the sauce is forming, cook gluten-free pasta according to package directions. I used Lundberg brown rice elbow macaroni and let the noodles boil for 8 minutes, adding a drizzle of olive oil to the water to help reduce sticking. Once cooked and drained, place back into the pot to combine with the cheese sauce.

After the cheese sauce and noodles have been combined, place mixture in an 8×8″ baking dish. Top with reserved cheddar cheese and bake at 400 for 20-25 minutes (or until your preferred level of cheesy brownness has been achieved).

2015-10-25 18.15.53

This could easily be a meal in itself, but I went full Donna Reed and served mine with turkey meatloaf, peas and carrots. Sunday supper at its finest.

Gluten-Free Mac and Cheese (serves 4-6)
**could easily be non-GF by subbing regular pasta and flour**

Ingredients:
1 16oz package gluten free pasta (I used Lundberg brown rice elbow macaroni)
1/4 cup butter
1/4 cup white rice flour (other GF flours could work well here, though GF all-purpose would be best)
1/2 tsp kosher salt
1/2 tsp fresh ground black pepper
1 tsp dijon mustard
1 1/4 cup whole milk
1 cup shredded parmesan cheese
1 1/2 cup shredded cheddar cheese, divided

Directions:
Preheat oven to 400. In a small pot on medium heat, melt butter. Once melted, add flour and whisk to combine until a paste forms. Add salt, pepper, dijon mustard, and milk. Whisk until well combined, but continue to check for roux that may not have whisked in. Bring mixture to a bubble, but not a boil. Once bubbling, reduce heat to low add 1 cup of parmesan and 1 cup of cheddar, reserving the remaining cheddar cheese for topping.

While sauce is forming, boil pasta according to package directions. Once cooked, drain and place back into pot. When cheese sauce is ready, pour over pasta and gently combine with a spatula.

Place pasta and cheese sauce mixture into an 8×8″ baking dish and top with reserved cheddar cheese. Bake for 20-25 minutes, or until your preferred level of browning has been reached.

Easiest Enchiladas Ever! {Gluten-Free}

I love, LOVE enchiladas, yet somehow forget how easy they can be. I whipped up a batch this week and am so glad I did. Now they are back on my list for easy weeknight dinners – which everyone needs a few of those in their pocket, right?

2015-09-29 18.29.52

A few months ago I found a new enchilada sauce at the farmers’ market I go to. Frontera (as in Mex-Mex Grill) now sells tons of sauces and marinades and I love them all. The list of ingredients is pretty short and the sauces have way more depth of flavor than your traditional canned enchilada sauce. Try some out for your next enchilada/taco/fajita/etc night. Your taste buds will thank you!

2015-09-29 18.34.35

The process is simple. You will need 2 packs of Frontera’s Red Chile Enchilada Sauce (I like mine saucy!), 1 pound of cooked ground turkey (brown the night before for an even quicker meal), 1/2 an onion (chopped), 8 corn tortillas, and 1 cup of shredded cheddar cheese.

Preheat oven to 350. In a bowl, mix together ground turkey, chopped onion, and one pack of enchilada sauce. Divide evenly between tortillas. Be careful not to overfill tortillas, you will want to make sure they can be rolled and placed seam side down in the pan without unrolling. If you any mixture leftover, you can sprinkle on top of your enchies.

Once enchiladas are assembled, pour over second pack of enchilada sauce and sprinkle shredded cheese. Bake for 30 minutes and top with sour cream, if desired. Enjoy! (I promise you will.)

2015-09-29 19.09.51

My Favorite Steak Salad

Working in numerous restaurants over the years has given me ample opportunity to mentally bookmark some of my favorite tricks and dishes. This salad is one of those favorites.

IMG_7653

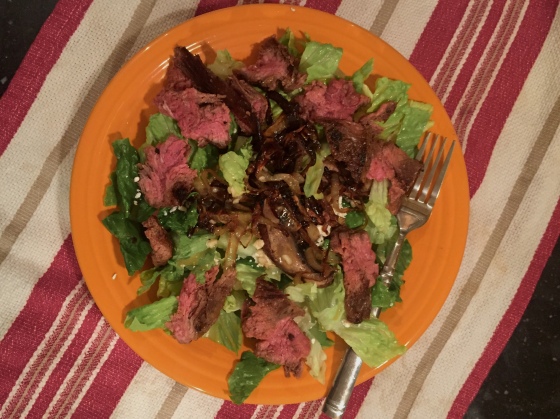
While there is a basic template for this recipe, it’s really versatile and can be changed up to suit your mood. The original recipe called for bleu cheese, but I went for goat cheese this round. (Crazy, I say!) The other staple ingredients are: flank steak, romaine lettuce, caramelized mushrooms, sautéed portobellos, and your vinaigrette of choice.

My steak marinade can differ depending on what’s available in the fridge. For this steak I used olive oil, Dale’s, tamari (gluten-free soy sauce), brown mustard, and fresh minced garlic.

I also like to make my own vinaigrette. I’m never a big fan of what I can buy at the grocery store, so making my own is immensely more satisfying (and contains much fewer ingredients!). My vinaigrette recipe also changes depending on what ingredients are available, but is usually a combo of olive oil, vinegar (red wine or balsamic), fresh minced garlic, mustard or lemon juice, and salt/pepper.

IMG_7644

I had started caramelizing my onions while the steak was marinating. Once the onions were really soft, I threw in the mushrooms so that they could soften as well. The steak was cooked the steak in a cast iron skillet, but any preparation would work well here.

The salad is best when steak and veggies are still warm, the cheese gets all melty and everything melds together really well.

Flank Steak Salad (serves 4):

1.5-2lbs flank steak
sweet onion, sliced
8oz portobello mushrooms, sliced
2 tsp olive oil, divided
2 cloves garlic, minced
Dale’s, splash
tamari, splash (or soy sauce)
1/2 tsp brown mustard (we used Gulden’s)
salt and pepper
1 head romaine lettuce
4oz crumbled goat cheese

Red Wine Vinaigrette (serves 4):

4 tbsp olive oil
4 tbsp red wine vinegar
1 clove minced garlic
1/2 tsp brown mustard
salt and pepper

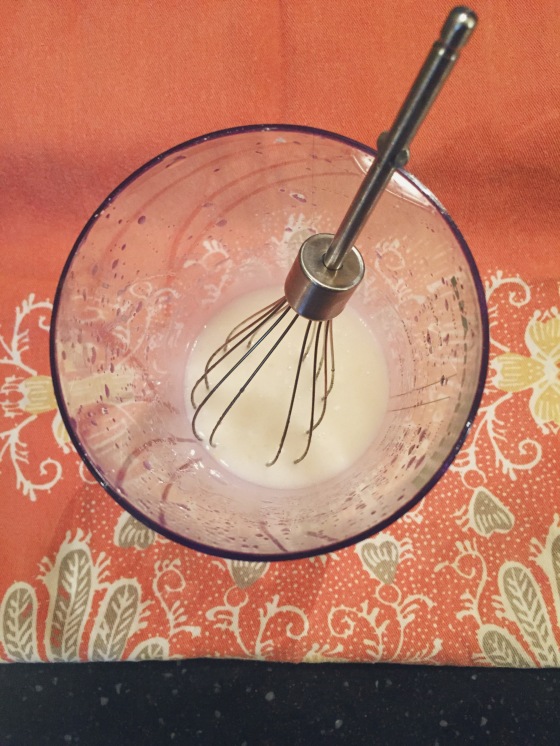
Combine 1 tsp olive oil, minced garlic, Dale’s, tamari, mustard, salt and pepper in a small bowl and whisk. Pour over steak and let marinate for 20-30 minutes. In the meantime, cook onions over med-low heat in 1 tsp of olive oil and season with salt and pepper. Once onions are soft, add in portobellos and reduce heat to low. Cook steak to desired temperature and let rest for a few minutes. If dressing has not been made in advance, combine all ingredients in a sealed container (I opted for a mason jar) and shake until well combined. Carve steak into bite-size pieces and assemble remaining ingredients. Enjoy!

Gluten-Free Chocolate Chip Cookies (that taste like the real deal!)

If I am offered a gluten-free cookie I will try it. Something in me can’t turn away a GF goody these days, mostly because they’re so few and far between (and hallelujah for that). A while back my friend brought a batch of these chocolate chip darlings to work and I thought I might die of happiness. They are the closest thing to a classic, chewy, chocolate chip cookie made with gluten-free flour that I have tried.

IMG_5944

This recipe, originally from Yammie’s Gluten Freedom, uses oat flour in the batter, which I just so happened to have on hand. Fair warning, not all oat flours are gluten-free. I picked up some from our farmers’ market that was not labeled GF, but didn’t make make me feel ill when I used it previously. I wouldn’t recommend everyone taking such a risk, so make sure to check your labels!

The batter is a little stickier and slightly drier than traditional cookie batters, but that is no reflection on the end product. Also, my cookies browned faster on the bottom than the top, but were a-ok after they cooled. Fair warning numero dos, I used a brand-new cookie sheet, which is different from cookie sheets I have used in the past, and may have had something to do with the browning.

Tex agreed that the taste like the real deal, and he’s an honest man. Also, pug wasn’t sure about so much picture taking and so little sharing.

IMG_1354

Gluten Free Chocolate Chip Cookies from Yammie’s Gluten Freedom

Makes 1 1/2 dozen cookies

1 stick butter
1/2 cup brown sugar
1/2 cup white sugar
1 egg
1 teaspoon vanilla
1/2 teaspoon baking soda
1/2 teaspoon salt
2 1/4 cup oat flour
3/4 cup chocolate chips

Preheat the oven to 350ºF.
Mix together the butter and sugars. The mixture will be slightly crumbly. Add the egg and vanilla and beat until smooth.
Mix together the soda, salt, and flour and add to the wet ingredients. Mix until well incorporated. Dough will be slightly sticky. Add the chocolate chips.
Bake on ungreased baking sheets for about 10 minutes or until the edges are just becoming golden.

Chocolate Chip + Pear Blondies {Gluten-free}

IMG_5023

I think I have discovered the perfect dessert. Chocolate, pear, brown sugar – three of my favorite flavors and all in one cute little package. Added bonus, all three flavors pair exceptionally well with vanilla gelato (but wait, what doesn’t pair well with vanilla gelato?)

IMG_5008

These little Blondie beauties are inspired by a recipe I saw over on Hummusapien. I modified based on what I had available, so they are not quite as healthy as hers are. However, since yesterday was the first day in FOUR AND A HALF MONTHS that we had a fully functioning oven, I felt that a celebration was in order.

IMG_5025

The recipe doesn’t make a ton of batter, which is good for those who live in a two person household and who don’t want to commit to blondies breakfast, lunch, and dinner.

IMG_5031

Since I’m not eating blondies all day, every day, I chose not to skimp on its vanilla cohost. If I’m going for a frozen treat, I’m going big. Talenti Tahitian Vanilla Bean Gelato all the way. Not only does it taste better, but the ingredient list is smaller and not chock full of chemical crap.

IMG_5020

IMG_5017

Chocolate Chip + Pear Blondies {adapted from Hummusapien}
Makes 8

INGREDIENTS
  • 1 egg
  • ½ cup brown sugar
  • ¼ cup oil
  • ½ tsp vanilla extract
  • ¾ cup gluten-free all purpose flour {I used Bob’s Red Mill}
  • ½ tsp salt
  • ½ tsp baking powder
  • 1 medium ripe pear, chopped into small pieces
  • ⅓ cup chocolate chips
INSTRUCTIONS
  1. Preheat oven to 350F. Grease or line 8 cups in a muffin tin.
  2. In a medium bowl, stir together brown sugar, oil, vanilla, and egg until combined.
  3. In another medium bowl, mix together flour, salt, and baking powder. Combine wet and dry ingredients.
  4. Fold in chopped pears and chocolate chips.
  5. Spoon mixture into mini muffin tins, making sure to distribute batter and pears evenly (the batter will be fairly sticky).
  6. Bake for approximately 25 minutes. Allow for blondies to cool before removing from wrappers.

Healthy Inspiration: Blogs I’m Loving

eat

While in the throes of all that is Whole30, I may have limited my perusing of non-Whole30 focused blogs, simply to save myself from all the cravings that would soon follow. This week I was back into my old blog reading ways and finding inspiration everywhere! It’s so refreshing.

My main source of inspiration this week has come from Hummusapien. Alexis is a registered dietician and knows how to make crazy yummy recipes that are jam-packed with veggies. Her Avocado Black Bean Burgers are on my list of all-time favorites and I am ready for next week to get here so I can make them already. If you’re of the vegetarian persuasion, or just like eating as many veggies as possible and all the hummus all the time, you must check her out. I also have her Super Easy Mexican Crockpot Casserole (with a few slight modifications) and her Mediterranean Quinoa Salad on my list for next week.

Another nom-inducing blog I’ve been all over this week is The Roasted Root. Julia’s cauliflower fried rice is calling my name, and paleo to boot. I can’t decide if I want to add a little meatiness to the dish or leave it as is. If we’re being honest, I really want a side of egg rolls and spicy mustard to go along with my fried cauli rice, but we all want what we can’t have. Also, she has endless treats over on her blog (many of them gluten-free and paleo) that I am looking forward to making real soon (I’m looking at you Grain Free Almond Butter Pumpkin Bars and Fudgy Paleo Beetroot Brownies.

What are your go-to blogs for healthy eats?